
Last updated: October 14, 2017
Introduction
As an active addon developer, it’s important to be able to reach your users to notify them when critical bug fixes or exciting new features are out. In the past, this required email subscribers view newsletter updates or followers to cross over social media posts. Now with the addon updater module, you can reach your users directly through blender — to both notify them of updates, and allow them to easily install it with a single click of a button.
This tutorial will show you how to integrate the addon updater code into existing addons. To get the code of the updater, click the button below
[button link=https://github.com/CGCookie/blender-addon-updater target=”_blank”]Get the updater code here[/button]
This addon updater module is used in RetopoFlow, Crowd Master, MCprep, and soon even more blender addons. See also the recent announcement on the importance of updating.
Video Tutorial
Text tutorial is below. Note this is outdated and only covers GitHub repos, but the content is still valid
Capabilities and Requirements
The updater allows an addon installed in blender to:
- Check for an update
- Check for updates in the background after intervals of time
- Notify the user of an update (via popup notification on startup)
- Allow the user to directly update to a version with a single button click
- Allow the user to install old versions of the addon, and revert back to backups after updating/reverting
- If enabled, allow for directly updating to the git Master code/another branch at any time
- Configurable in many ways, such as to only notify users of updates without permitting one-click installation.
Requirements:
- Currently, your project must be hosted in GitHub, GitLab, or Bitbucket as a public repository. There is also current support for private GitLab repositories. Private repository support for GitHub and bitbucket is planned.
- To make full use of the features, you should be using git tags/releases. While these are not covered in this tutorial, see example usage of releases here (tags are a feature of all git repositories, so it works the same on GitHub, GitLab, and Bitbucket but perhaps with different website UI).
- Have an addon with a .zip install structure, i.e. containing an __init__.py file and support files included in the same zip file for installing, as opposed to self-contained addons installed as a single python file.
- The blender bl_info versions should match the git release version. e.g. in __init__.py: “version”:(1,0,1) will get paired with a git release/tag title of “1.0.1”, “v1.0.1”, “1.0.1 release” or similar such naming structures.
- The addon should have the __init__.py file and relative code structure at the root of the repository, not in a sub folder. The updater will try to install updates by directly installing the repository’s zip file.
About the updater module code
As a very brief note before jumping into the tutorial steps itself, it is helpful to understand how the updater is set up. There are two files: 1) the addon_updater.py file and 2) addon_updater_ops.py file
The addon_updater.py file is a pure python class implemented as a singleton. This module can be imported into multiple different python files in the addon to access the shared data and status. A developer should not need to modify this file.
The addon_updater_ops.py is a file which provides out-of-the-box user interfaces and other blender-side code. A developer should feel free to modify this file to suit needs.
Text Tutorial: Integrating an existing addon
Now let’s get into the meat of it! There’s really only a few places to copy-paste values before your addon is up and running with the updater module.
Step 1 – Initial Setup
Copy the Python Module (addon_updater.py) and the Operator File (addon_updater_ops.py) to the root folder of your existing addon folder. For this tutorial, that means placing it in the same directory as the __init__.py file.
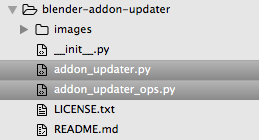
Example file placement
Step 2 – Import Modules
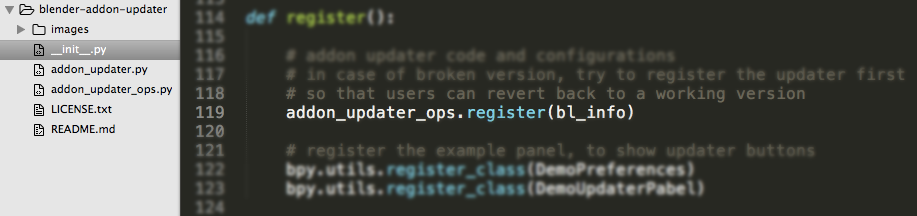
Import the updater operator in the __init__.py file e.g. from . import addon_updater_ops at the top with other module imports like import bpy. This will allow us to register the updater code appropriately.

Import the local module using this relative import method
Step 3 – Register the Updater
In the register function of __init__.py, run the addon’s def register() function by adding addon_updater_ops.register(bl_info).
Consider trying to place the updater register near the top of the addon’s register function along with any preferences function so that if the user updates/reverts to a non-working version of the addon, they can still use the updater to restore backwards.
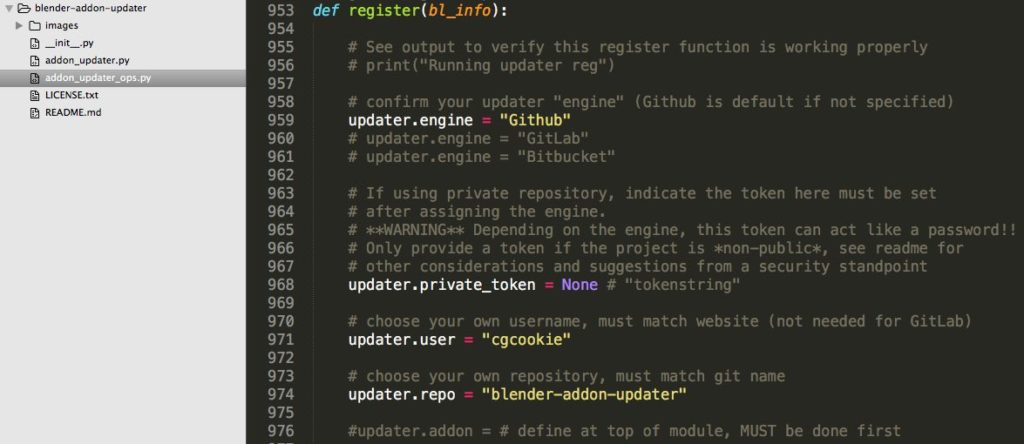
Step 4 – Github/GitLab/Bitbucket Details (plus other settings)
Edit the according fields in the register function of the addon_updater_ops.py file, specifically making sure to set the user and repo settings based on your git repository and username.
Click on the heading to see the desired sample code
[sections]
[section title=”GitHub settings”]
updater.engine = "Github"
updater.user = "your-github-username" # e.g. "theduckcow", should match repo url
updater.repo = "your-repo-name" # should match repo url
updater.current_version = bl_info["version"]
For obtaining your username and repository name, make sure it matches github itself. For example, the repository with this link https://github.com/CGCookie/blender-addon-updater has the username “CGCookie” and the repository name “blender-addon-updater”.
[/section]
[section title=”GitLab settings”]
updater.engine = "GitLab"
updater.user = "" # not actually not needed for GitLab but still must set it to an empty string
updater.repo = "your-repo-name" # actually a number like 1234567, see below
updater.current_version = bl_info["version"]
To find the GitLab repository number, go to general settings
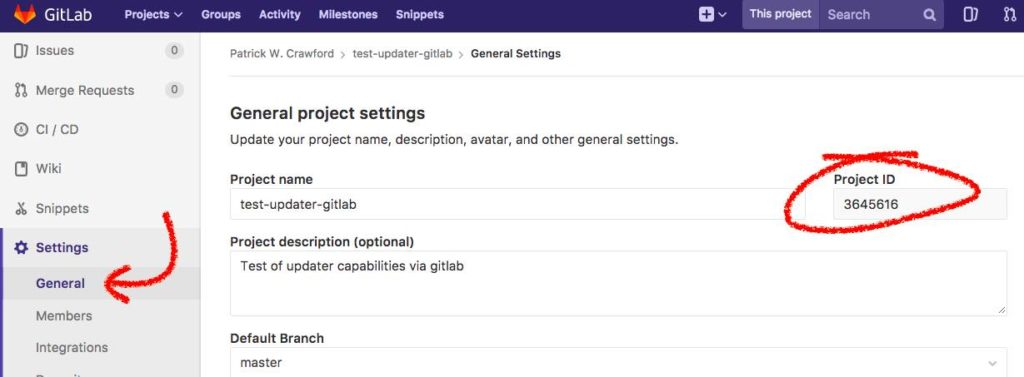
For obtaining your repository name, make sure it matches gitlab’s Project ID. To find this, go into settings/general, and copy the Project ID box top right – it should be a multi-digit number, which will be unique across all GitLab projects. In this case, it is “3645616”, be sure to supply the Project ID as a string, and set the username to be a blank value such as “”, noting it is ignored but still required.
[/section]
[section title=”Bitbucket settings”]
updater.engine = "Bitbucket"
updater.user = "your-bitbucket-username" # e.g. "theduckcow", should match repo url
updater.repo = "your-repo-name" # should match repo url
updater.current_version = bl_info["version"]
For obtaining your username and repository name, make sure it matches bitbucket itself. For example, a repository with this link https://bitbucket.org/TheDuckCow/blender-addon-updater-bitbucket has the username “TheDuckCow” and the repository name “blender-addon-updater-bitbucket”.
[/section]
[/sections]
See the documentation on the README page for more on these options, but at the bare minimum set the username and repository.
See all additional settings and configurations in the readme file
Other settings
Additionally, you may want to make use of minimum version update parameter if your repository already uses releases prior to implementing the updating code. This way, you can specify the lowest version of the addon that can be installed, which essentially should be equal to the first version where the updater code is included so the user has the updater UI itself allowing to revert.
A new feature of the updater module since v1.0.4 are overwrite and pre-removal patterns. See the readme for more explanation and examples, but you should consider reviewing how your addon is used (any resource files? User generated/updated files? Files that should be overwritten or ignored during update?) and adjust these patterns appropriately. Note that the demo updater addon is configured in a way that would be appropriate for most uses, but slightly differs from how blender natively would updated addons through the UI. The default updater module will behave like blender natively (ie if you remove the lines which overwrite the default values for overwrite_patterns and remove_pre_update_patterns).
Step 5 – Change the updater.addon value
Make sure to change the updater.addon property atop the Operator file (addon_updater_ops.py). This is used in defining your operator bl_idname’s throughout the file allowing them to register and not clash with any other operators using the same name.
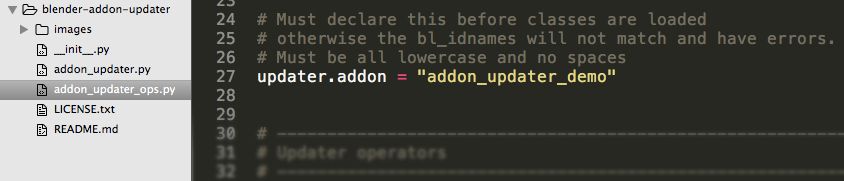
Change the string value to something similar to your addon name
This is very important to do, as if the default value is used there will be registration overlap errors with any other addons that did not change this value. Additionally, it must be placed (i.e. kept where it is) before all updater class definitions due to bl_idname’s being assigned once at the time a class loads. Instead of using this variable, you could go through each operator and class and directly input the bl_idname to ensure it is unique.
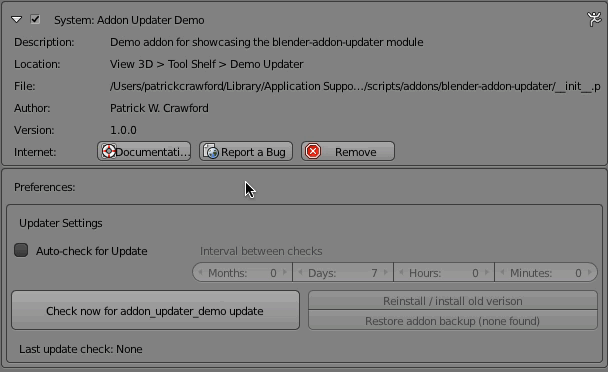
Step 6 – Addon Preferences Panel
To get the updater UI in the preferences draw panel and show all settings, add the line addon_updater_ops.update_settings_ui(self,context) to the end of the preferences class draw function.
Be sure to import the addon_updater_ops file if preferences are defined in a file other than the addon’s `__init__.py` where already imported via from . import addon_updater_ops like before.
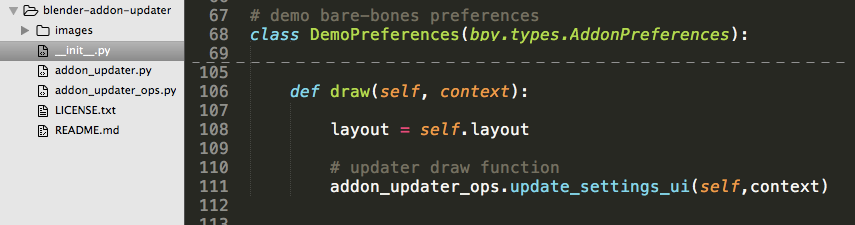
Add the function call to the end of the user preferences draw function, or wherever you want the updater UI box to appear.
If your addon does not use user preferences already, then use the base setup included in demo addon. This can be defined in any file, just be sure to also register the class like any UI Panel.
Step 7 – Addon User Preference Properties
Add the needed blender properties to make the sample updater preferences UI work by copying over the blender properties from the sample demo addon’s DemoPreferences class, located in the __init__.py file. Change the defaults as desired.
# addon updater preferences from `__init__`, be sure to copy all of them
auto_check_update = bpy.props.BoolProperty(
    name = "Auto-check for Update",
    description = "If enabled, auto-check for updates using an interval",
    default = False,
)

updater_intrval_months = bpy.props.IntProperty(
    name='Months',
    description = "Number of months between checking for updates",
    default=0,
    min=0
)
updater_intrval_days = bpy.props.IntProperty(
    name='Days',
    description = "Number of days between checking for updates",
    default=7,
    min=0,
)
updater_intrval_hours = bpy.props.IntProperty(
    name='Hours',
    description = "Number of hours between checking for updates",
    default=0,
    min=0,
    max=23
)
updater_intrval_minutes = bpy.props.IntProperty(
    name='Minutes',
    description = "Number of minutes between checking for updates",
    default=0,
    min=0,
    max=59
)
Copy the above properties into the preferences class, like shown below.
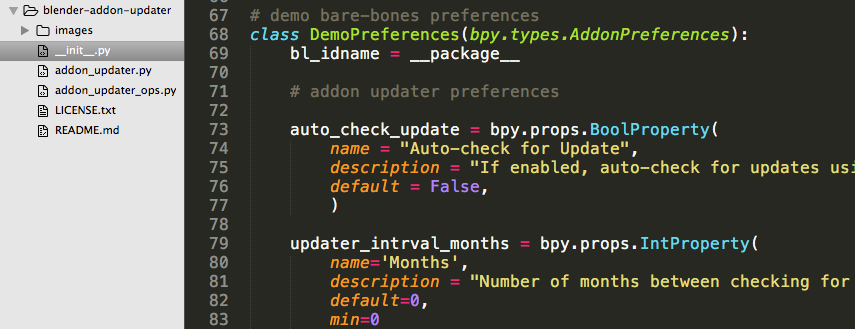
Place the properties above in the class-level definition of user preferences
Step 8 – Add updater to any panel (optional)
If you want to make use of auto-check for update, then you need to add the trigger code and UI code into a panel, such as one already used by your addon. This takes two steps:
- Add the
addon_updater_ops.check_for_update_background(context)to the top of the draw function of your panel. This does not contain any draw code, but rather when run does a check to see if auto check for update is enabled and the interval of time has passed. If it passes, then it checks for update in a background thread and triggers a popup. This will not block the blender drawing thread, and only will run once per blender instance. - Add
addon_updater_ops.update_notice_box_ui(self, context)to the end of the draw function. This contains actual draw code. If an update is available, then this will display an update notice box.
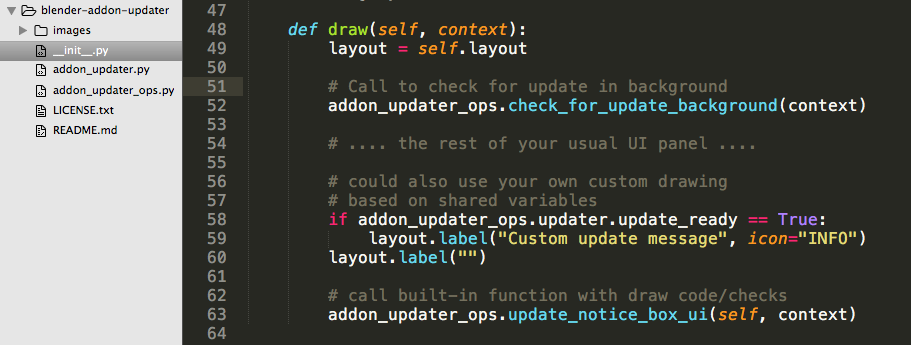
The code to add to your panel’s draw function in any panels or interfaces appropriate.
You can add the draw call to as many panels as you would like to indicate there is an update. Again make sure to import the Operator module if this panel is defined in a file other than the addon’s __init__.py file.
Note you can also easily make your own custom “update ready!” notice by checking if addon_updater_ops.updater.update_ready == True like in the screenshot above. It would make sense to either create a custom notice or use the provided update_notice_box_ui function.
The design paradigm here is to trigger checks for update only when the draw panel is run, not on registration of the addon itself. Thus, if a user isn’t actively using an addon or it’s panel, it won’t check for an update.
Note that this step is optional, but choosing to not include the check_for_update_background in a draw or register function will render the auto_check for update and interval settings pointless. If this is your choice, then be sure to remove the auto-check and interval-related content from the update_settings_ui(self,context) function of the operator file.
Step 9 – Tags and Releases
Ensure at least one release or tag exists on the repository. As an alternative or in addition to using releases, the setting updater.include_branches = True in the addon_updater_ops.py register function allows you to update to specific branches such as master. You then should specify which branches using, for example updater.include_branche_list = ["master", "dev"] where the contents of the list explicitly indicate which branches to include.
Click on the according repository host for setup specifics
[sections]
[section title=”GitHub tags”]
See this page about creating releases and tags on GitHub.
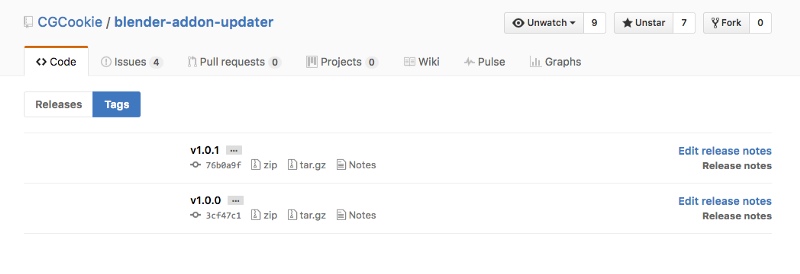
You can find/create tags by going to releases and then pressing on tags, or by using the equivalent url: https://github.com/CGCookie/blender-addon-updater/tags
If no releases are found, the user preferences button will always show “Update to Master” (or whichever branch is listed first in include_branch)list) without doing any version checking.
[/section]
[section title=”GitLab tags”]
See the screenshot below for how to create tags on GitLab
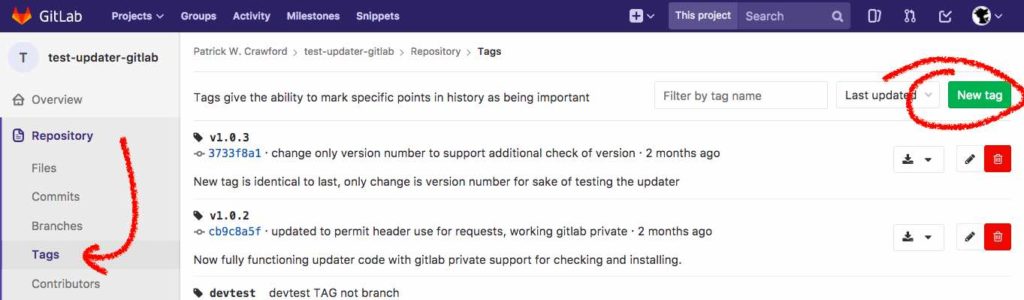
You can find/create tags by going to repository and then clicking on tags, or by using the equivalent url:
https://gitlab.com/TheDuckCow/test-updater-gitlab/tags
[/section]
[section title=”Bitbucket tags”]
See this page about creating tags on Bitbucket
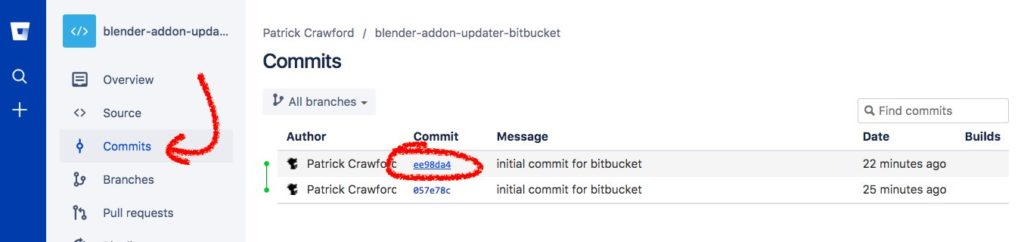
You can create tags by going to repository and then clicking on commits, or by using the equivalent url:
https://bitbucket.org/TheDuckCow/blender-addon-updater-bitbucket/commits/all
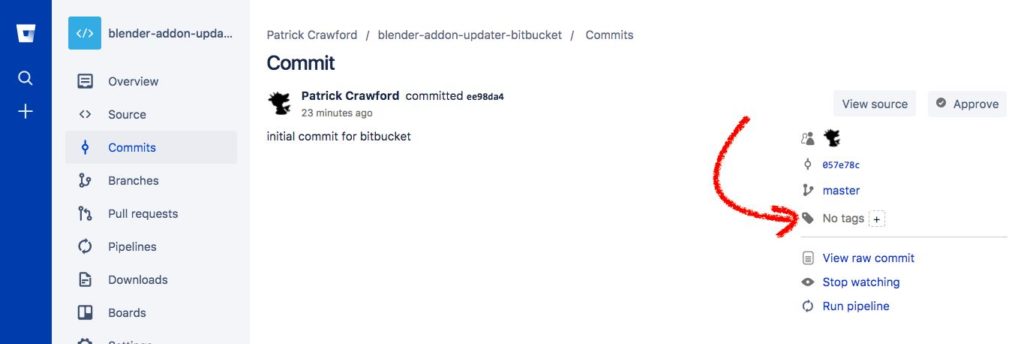 Next, click on the individual commit to be used as the release tag, then click on the + next to No tags
[/section]
[/sections]
All set!
You should now be good to go! At the end of the day, you should be able to enjoy checking for updates, installing them, and reverting all based on your git repository tags.
Have any troubles or find a bug? Open an issue here!
Interested in implementing your own custom updater UI or a bare-bones setup? See this documentation here. Happy blending — and updating!